
300x600
Fun DIY Acrylic Wall Hanging

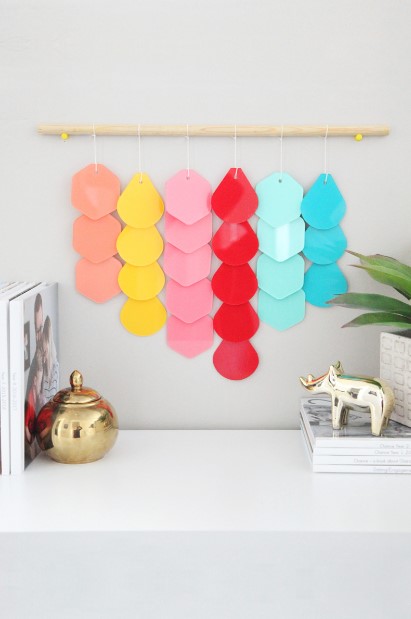
Once the kids are back in school, I always feel the urge to not only clean and declutter my house, but to freshen it up with some bright new decorations. A lot of times that means I make something myself because I love to do it, and I can make something I wouldn’t find at any stores. And today, I’m going to share one of these projects with you – this cheery DIY Acrylic Wall Hanging! With beautiful bright colors and shiny acrylic, it’s the perfect way to add new life to your home. Here’s how I made it…
Supplies needed to make your own Acrylic Wall Hanging:
- Acrylic Gem Shapes
- Adhesive vinyl
- Vinyl scraper/credit card/ruler
- X-Acto Knife
- Cutting mat
- Twine
- Dowel

Step 1: Cut a piece of vinyl roughly to the size of one of the shapes. This is a perfect project for using up some of your vinyl scraps (if you have a stash like me)! Remove the vinyl from the backing and apply to the shape.

Step 2: Use a scraper (a credit card or ruler would work, too) to smooth out air bubbles (lifting the vinyl, if needed).

Step 3: Flip the shape so it lays on top of the vinyl. Use your knife to cut the vinyl around the edge of the shape.

Step 4: Repeat this process with as many shapes and colors as you’d like. It’s a really therapeutic process (my favorite kind)!

Step 5: Cut a string for each color of shapes. Tie one shape to the end of the string.

Step 6: Layer another shape over the bottom shape, and tie it in place on the string, ensuring the string and knots are hidden on the vinyl side.

Step 7: Repeat this process until you have created strands for each color.

Step 8: Attach each strand to the dowel and hang on the wall.

This project is so fun and colorful, and I love how the acrylic reflects light! Such a fun and simple project that makes a big impact!


0 Komentar