
300x600
Ways to Make Beaded DIY Earrings

Learning ways to make jewelry is so much fun and a lot less messy than anything I do with paint and furniture. When you are feeling creative but don’t want a giant project or mess, grab your earring making tools and let’s make some adorable DIY earrings.
Supplies & Tools Needed to Make DIY Earrings
Materials Needed / Source List:
- Jewelry wire – 18 gauge and 26 gauge
- Jewelry pliers – cutting pliers, looping pliers and flat nose pliers
- Crystal beads
- Seed beads
- Earring hooks
- Ruler
Ways to Make Earrings
When it comes to handmade earrings there are so many options and styles that you can go for. Some prefer clay jewelry but personally, I love DIY beaded earrings. With different colors and beads, you are never limited with earring ideas.

The first step in how to make earrings, like any DIY project is to gather your supplies.

How to Make Beaded Earrings
Step 1 – To make the wire frame, I am using blank wire hoop earrings instead of jewelry wire, but either will work.
If you are using jewelry wire, take the 18 gauge wire and create a small loop at the open end of the wire by using the looping pliers. You can get looping pliers in a jewelry making kit or individually. If you get them individually these are pretty cool looping pliers:

If you are using the wire hoop earring, it should have a small loop at one end and a half cm length bent to 90 degrees at the other open end. Straighten the bent part of the closure system and keep the small loop.

Step 2 – Bend the loop part to 90 degrees with the rest of the wire. Use a ruler to measure 1.5 cm and then bent the wire to another 90 degrees (towards the opposite side of the loop’s position.

Step 3 – Next, measure 4.5 cm along the current bent wire and then bend the rest of the wire to 90 degrees again (clockwise). As you can see, we are starting to turn our circle into more of a rectangle.

Step 4 – Measure 3 cm and then bend your wire clockwise. Measure 4.5 cm and bend the wire to 90 degrees again.

Step 5 – If you are using the hoop earrings you will need to measure its total length before creating the frame with it. However, keep 1.5 cm wire straight on the current wire and then coil the rest of the wire below the loop (from the first step). Your DIY earrings frame is complete. Now do the same thing for the second earring.

Adding Beads to Your Homemade Earrings
Step 6 – Now take the 26 gauge wire and cut out any length from 10 cm to 12 cm. Coil the wire 2 or 3 times around the frame’s bottom sidebar. Insert seed beads into the coiled wire through its open end.

Step 7 – Once the beading is done, coil the open end of the wire around the sidebar next to it to secure the beading. Use the flat nose pliers to flatten the coil with the frame.

Step 8 – Bring the wire inside the frame again and start beading it. Once the beading reaches the sidebar next to its current sidebar, stop beading and coil the wire around that bar 2 or 3 times.

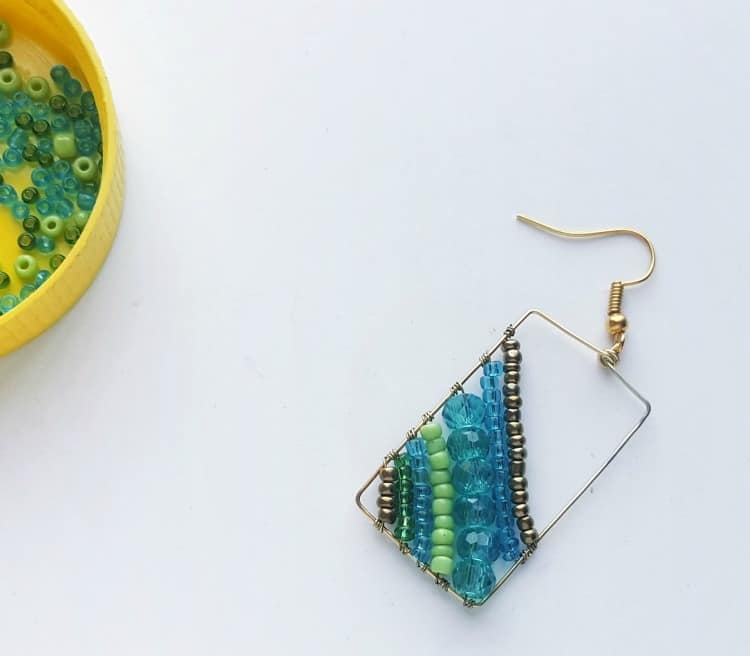
Step 9 – Continue on and create more beaded wires inside the frame. You can either fill the entire frame or bead the frame halfway through, however you like it. This is where you get to be as creative as you want to be.

Step 10 – Attach the earring hook with the loop of the beaded frame to complete your beaded DIY earring.
Step 11- Obviously, you will need to repeat all of these steps for the matching handmade earring.

Now that you know ways to make earrings you can go crazy with different beaded earring ideas and change up the sizes and colors of your beads and wire. These handmade earrings would also make great gifts for friends, family or even teachers. Because no one needs another #1 anything mug.


0 Komentar